PHP
FlashPanel makes it easy to toggle the default version for the server, set maximum file upload size, maximum execution time, and enable/disable OPCache.
! Install PHP manually
If you choose to manually install PHP versions on your server, FlashPanel will not know about those PHP settings. FlashPanel only knows about PHP settings managed through the FlashPanel control panel.
Multiple PHP Versions
When creating a server, you must decide which version of PHP you want to install as the default version. The PHP CLI on your server will point to the installed version selected at creation time.
Once the server has been created, FlashPanel makes it easy to install additional instances alongside the default instance. In the following document, we will discuss how to manage these additional PHP versions.
PHP-FPM Pool Management with Multi-User and Multi-Version
FlashPanel manages PHP using a separate PHP Pool for each user and each PHP version model. This ensures maximum isolation and security between users on the same server.
📊 Architecture Diagram
┌─────────────────────────────────────────────────────────────────┐
│                         Server                                  │
│                                                                 │
│  ┌──────────────┐                    ┌──────────────┐           │
│  │  System User │                    │  System User │           │
│  │     abc      │                    │     xyz      │           │
│  └──────────────┘                    └──────────────┘           │
│         │                                    │                  │
│         │                                    │                  │
│  ┌──────▼──────────────────┐        ┌───────▼─────────────────┐ │
│  │     PHP 8.0             │        │     PHP 8.0             │ │
│  │  www-abc.conf           │        │  www-xyz.conf           │ │
│  │  listen: /run/php/      │        │  listen: /run/php/      │ │
│  │    php8.0-fpm-abc.sock  │        │    php8.0-fpm-xyz.sock  │ │
│  │  user: abc              │        │  user: xyz              │ │
│  │  group: abc             │        │  group: xyz             │ │
│  └─────────────────────────┘        └─────────────────────────┘ │
│                                                                 │
│  ┌─────────────────────────┐        ┌─────────────────────────┐ │
│  │     PHP 8.4             │        │     PHP 8.4             │ │
│  │  www-abc.conf           │        │  www-xyz.conf           │ │
│  │  listen: /run/php/      │        │  listen: /run/php/      │ │
│  │    php8.4-fpm-abc.sock  │        │    php8.4-fpm-xyz.sock  │ │
│  │  user: abc              │        │  user: xyz              │ │
│  │  group: abc             │        │  group: xyz             │ │
│  └─────────────────────────┘        └─────────────────────────┘ │
│                                                                 │
└─────────────────────────────────────────────────────────────────┘

Formula: Total Pools = Number of Users × Number of PHP Versions
Example: 2 users × 2 PHP versions = 4 pools
🔍 Detailed Explanation
1. Pool Directory Structure
Each PHP version has its own pool directory:
- PHP 8.0:
/etc/php/8.0/fpm/pool.d/ - PHP 8.4:
/etc/php/8.4/fpm/pool.d/
2. Pool File Naming
Format: www-{username}.conf
- User
abc+ PHP 8.0 →/etc/php/8.0/fpm/pool.d/www-abc.conf - User
xyz+ PHP 8.0 →/etc/php/8.0/fpm/pool.d/www-xyz.conf - User
abc+ PHP 8.4 →/etc/php/8.4/fpm/pool.d/www-abc.conf - User
xyz+ PHP 8.4 →/etc/php/8.4/fpm/pool.d/www-xyz.conf
3. Separate Unix Sockets
Each pool listens on its own socket:
- Format:
/run/php/php{version}-fpm-{username}.sock - Examples:
/run/php/php8.0-fpm-abc.sock/run/php/php8.0-fpm-xyz.sock/run/php/php8.4-fpm-abc.sock/run/php/php8.4-fpm-xyz.sock
4. Ownership
Each pool runs with its own user permissions:
- Pool for user
abc:user = abc, group = abc - Pool for user
xyz:user = xyz, group = xyz
5. Benefits of This Model
✅ High Security: User abc cannot access user xyz's files
✅ Complete Isolation: Error in one pool doesn't affect other pools
✅ Flexibility: Each site can run different PHP versions
✅ Performance: Easy to adjust resources for each pool
✅ Easy Management: Can restart individual pools without affecting the entire system
6. Real-World Example
Server with:
- 3 system users:
user1,user2,user3 - 3 PHP versions:
8.0,8.2,8.4
Total pools created: 3 users × 3 versions = 9 pools
/etc/php/8.0/fpm/pool.d/www-user1.conf
/etc/php/8.0/fpm/pool.d/www-user2.conf
/etc/php/8.0/fpm/pool.d/www-user3.conf
/etc/php/8.2/fpm/pool.d/www-user1.conf
/etc/php/8.2/fpm/pool.d/www-user2.conf
/etc/php/8.2/fpm/pool.d/www-user3.conf
/etc/php/8.4/fpm/pool.d/www-user1.conf
/etc/php/8.4/fpm/pool.d/www-user2.conf
/etc/php/8.4/fpm/pool.d/www-user3.conf
Setting
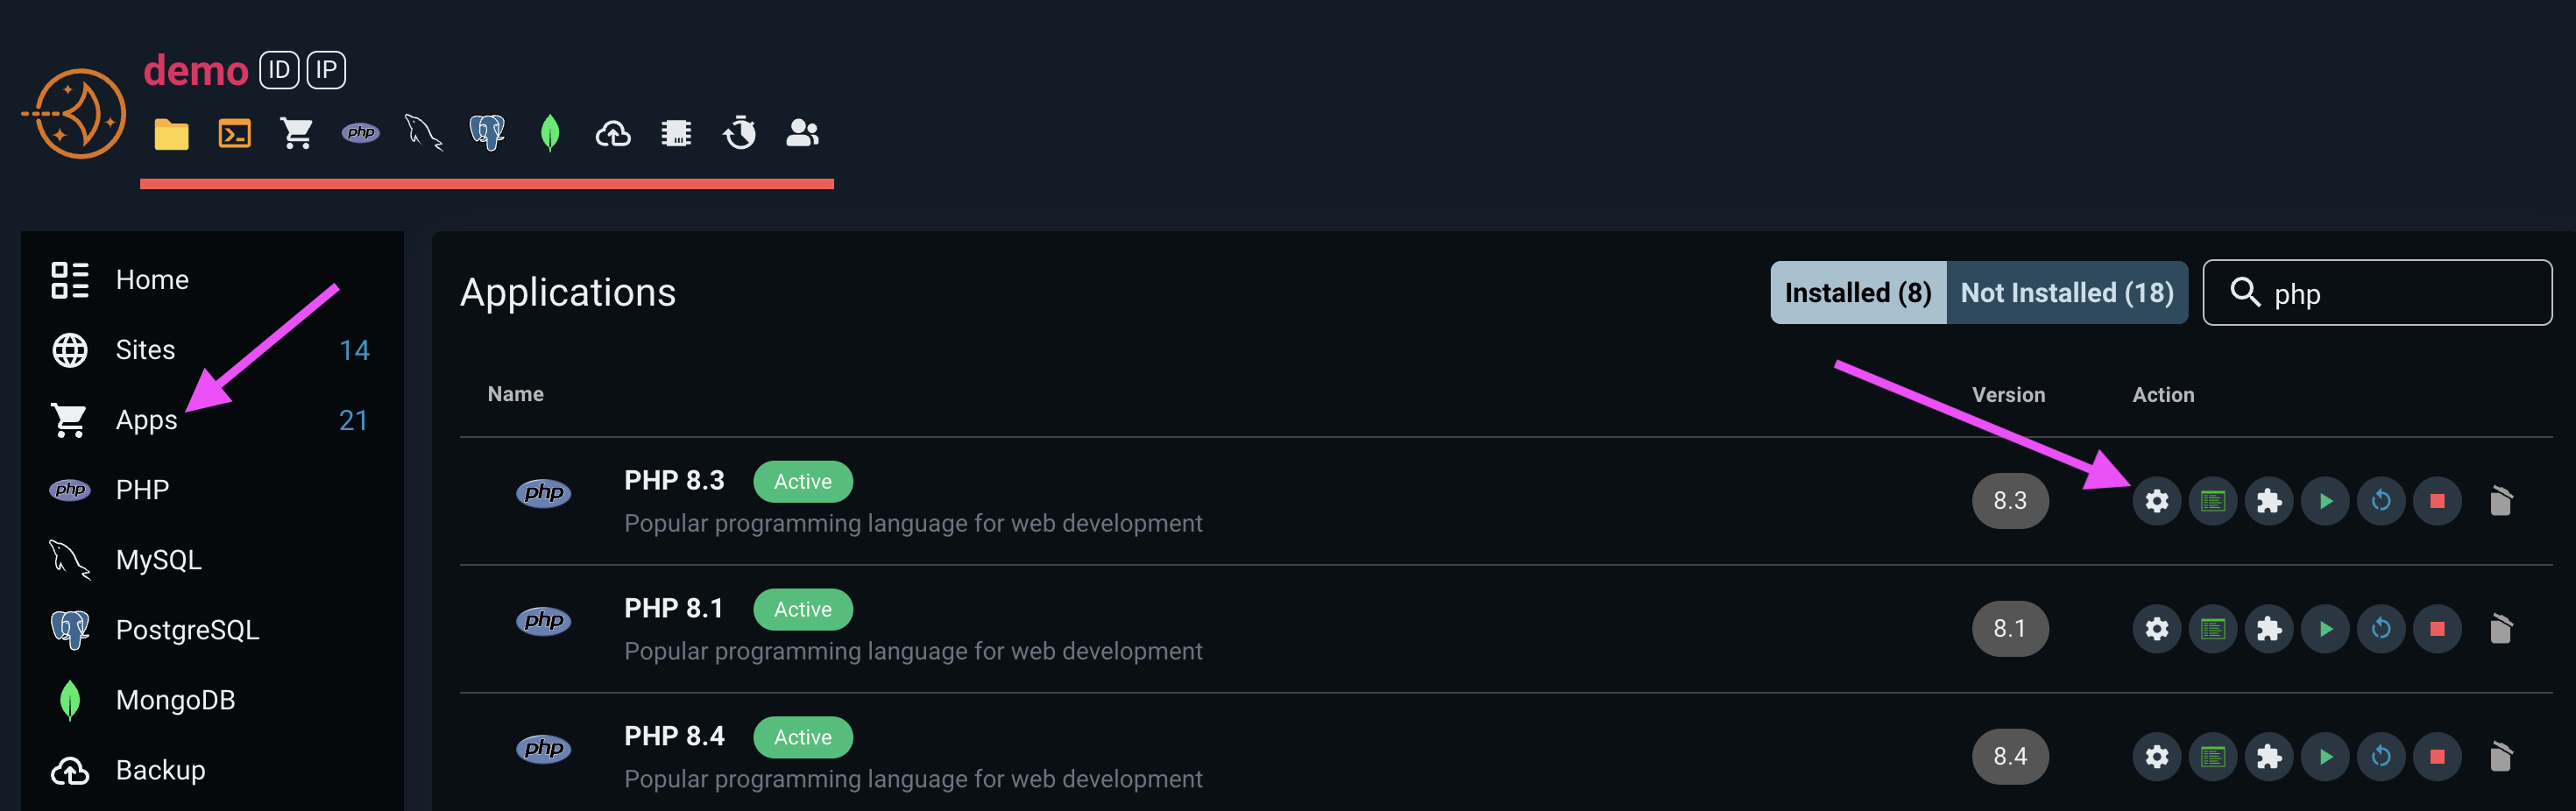
You can install additional PHP versions through the Applications tab on the server's management console. Once an additional PHP version has been installed, you can select it when creating a website or when switching the PHP version of a website.
When you install a new PHP version to your server, FlashPanel creates and configures the PHP-FPM process for that version. This means your server will be running multiple versions of PHP at the same time.
Uninstall
You can uninstall PHP versions through the Applications tab on the server's management console. You can choose to uninstall the PHP version as long as:
- There are other versions installed.
- The version you want to uninstall is not the server's default version for new sites.
- The version you want to uninstall is not the server's default version on CLI.
- The version you want to uninstall is not used by any website.
Install PHPRedis with igbinary and zstd + lz4
WARNING
OpenLiteSpeed does not apply
Go to Application > PHP and install extension
php8.2-redis,php8.2-igbinary,php8.2-lz4.Go to Server > Terminal (root user) and run the command
bashapt update && apt install liblz4-dev libzstd-dev pecl uninstall redis pecl install --configureoptions 'enable-redis-igbinary="yes" enable-redis-zstd="yes" enable-redis-lz4="yes"' redisIt will report an error related to php_ini but can be ignored.
Check the results with the command
php -ri redisThe result as shown in the picture is ok.
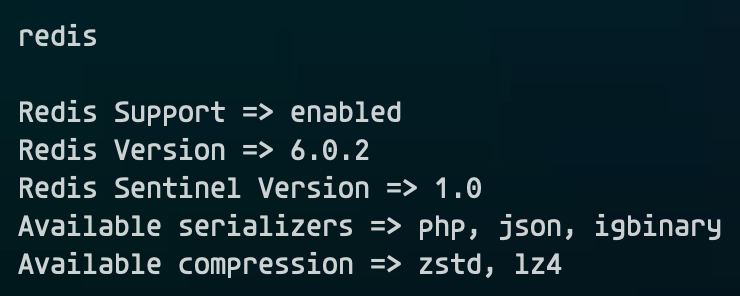
Those who run multiple sites sharing the same Redis instance, especially 'Wordpress' and 'Woocommerce' sites, should consider turning on compression for more optimization.
PHP Management & Configuration
WARNING
Changing the following settings will apply the changes to all PHP versions installed on the server.
IonCube Loader
This feature allows you to install IonCube Loader for the PHP version you want.
When you click on the IonCube Loader feature block, you will see the PHP versions that support IonCube Loader and their installation status. You can click the install or uninstall button to manage IonCube Loader as desired.
Switch PHP Default Version
The 'default' PHP version is the PHP version that will be used by default when creating a new website on the server. Conversion steps:
- At the server management console > Select
PHP Default Version - Select the PHP version you want to transfer
- Select
Update
When selecting a new PHP version as the 'default' version for your server, PHP versions used by existing websites will not be updated.
Maximum file upload size
You can configure the maximum file upload size in the server management console. Values are provided in megabytes. For reference, 1024MB is 1GB.
Maximum execution time
You can configure the maximum execution time at the server management console. The value provided is in seconds.
OPcache
OPcache is a bytecode caching technology that helps speed up PHP application execution. Every time a PHP script is executed, PHP needs to compile the script into bytecode. OPcache stores this bytecode in memory, allowing subsequent executions to skip recompilation, saving time and making your application run significantly faster.
Enable/Disable OPcache
You can enable or disable OPcache directly from the server management console:
- In the server management console, navigate to the PHP section
- Select the OPcache feature
- The screen displays information about OPcache and its current status (enabled or disabled)
- Click the Enable button to activate OPcache, or the Disable button to deactivate OPcache
- The system will automatically configure and restart the PHP-FPM service
Important Note
If you enable OPcache for a production environment, you should ensure that your deployment script restarts the PHP-FPM service at the end of each deployment. This ensures that OPcache is refreshed and uses the latest code.
Advanced OPcache Configuration
In addition to enabling/disabling OPcache, you can customize OPcache parameters in the Update PHP.ini Configuration section below.
Update PHP.ini Configuration
You no longer need to access SSH or manually edit complex configs php ini.
✅ Now you can edit your PHP settings directly from the web interface with just a few clicks.
🎯 What Can This Feature Help You With?
- ✅ Change PHP settings easily without needing programming skills.
- ✅ No more opening terminal windows or editing config files.
- ✅ Friendly interface with clear descriptions.
- ✅ Changes apply to both:
- PHP for websites (PHP-FPM)
- PHP for command-line tools (CLI)
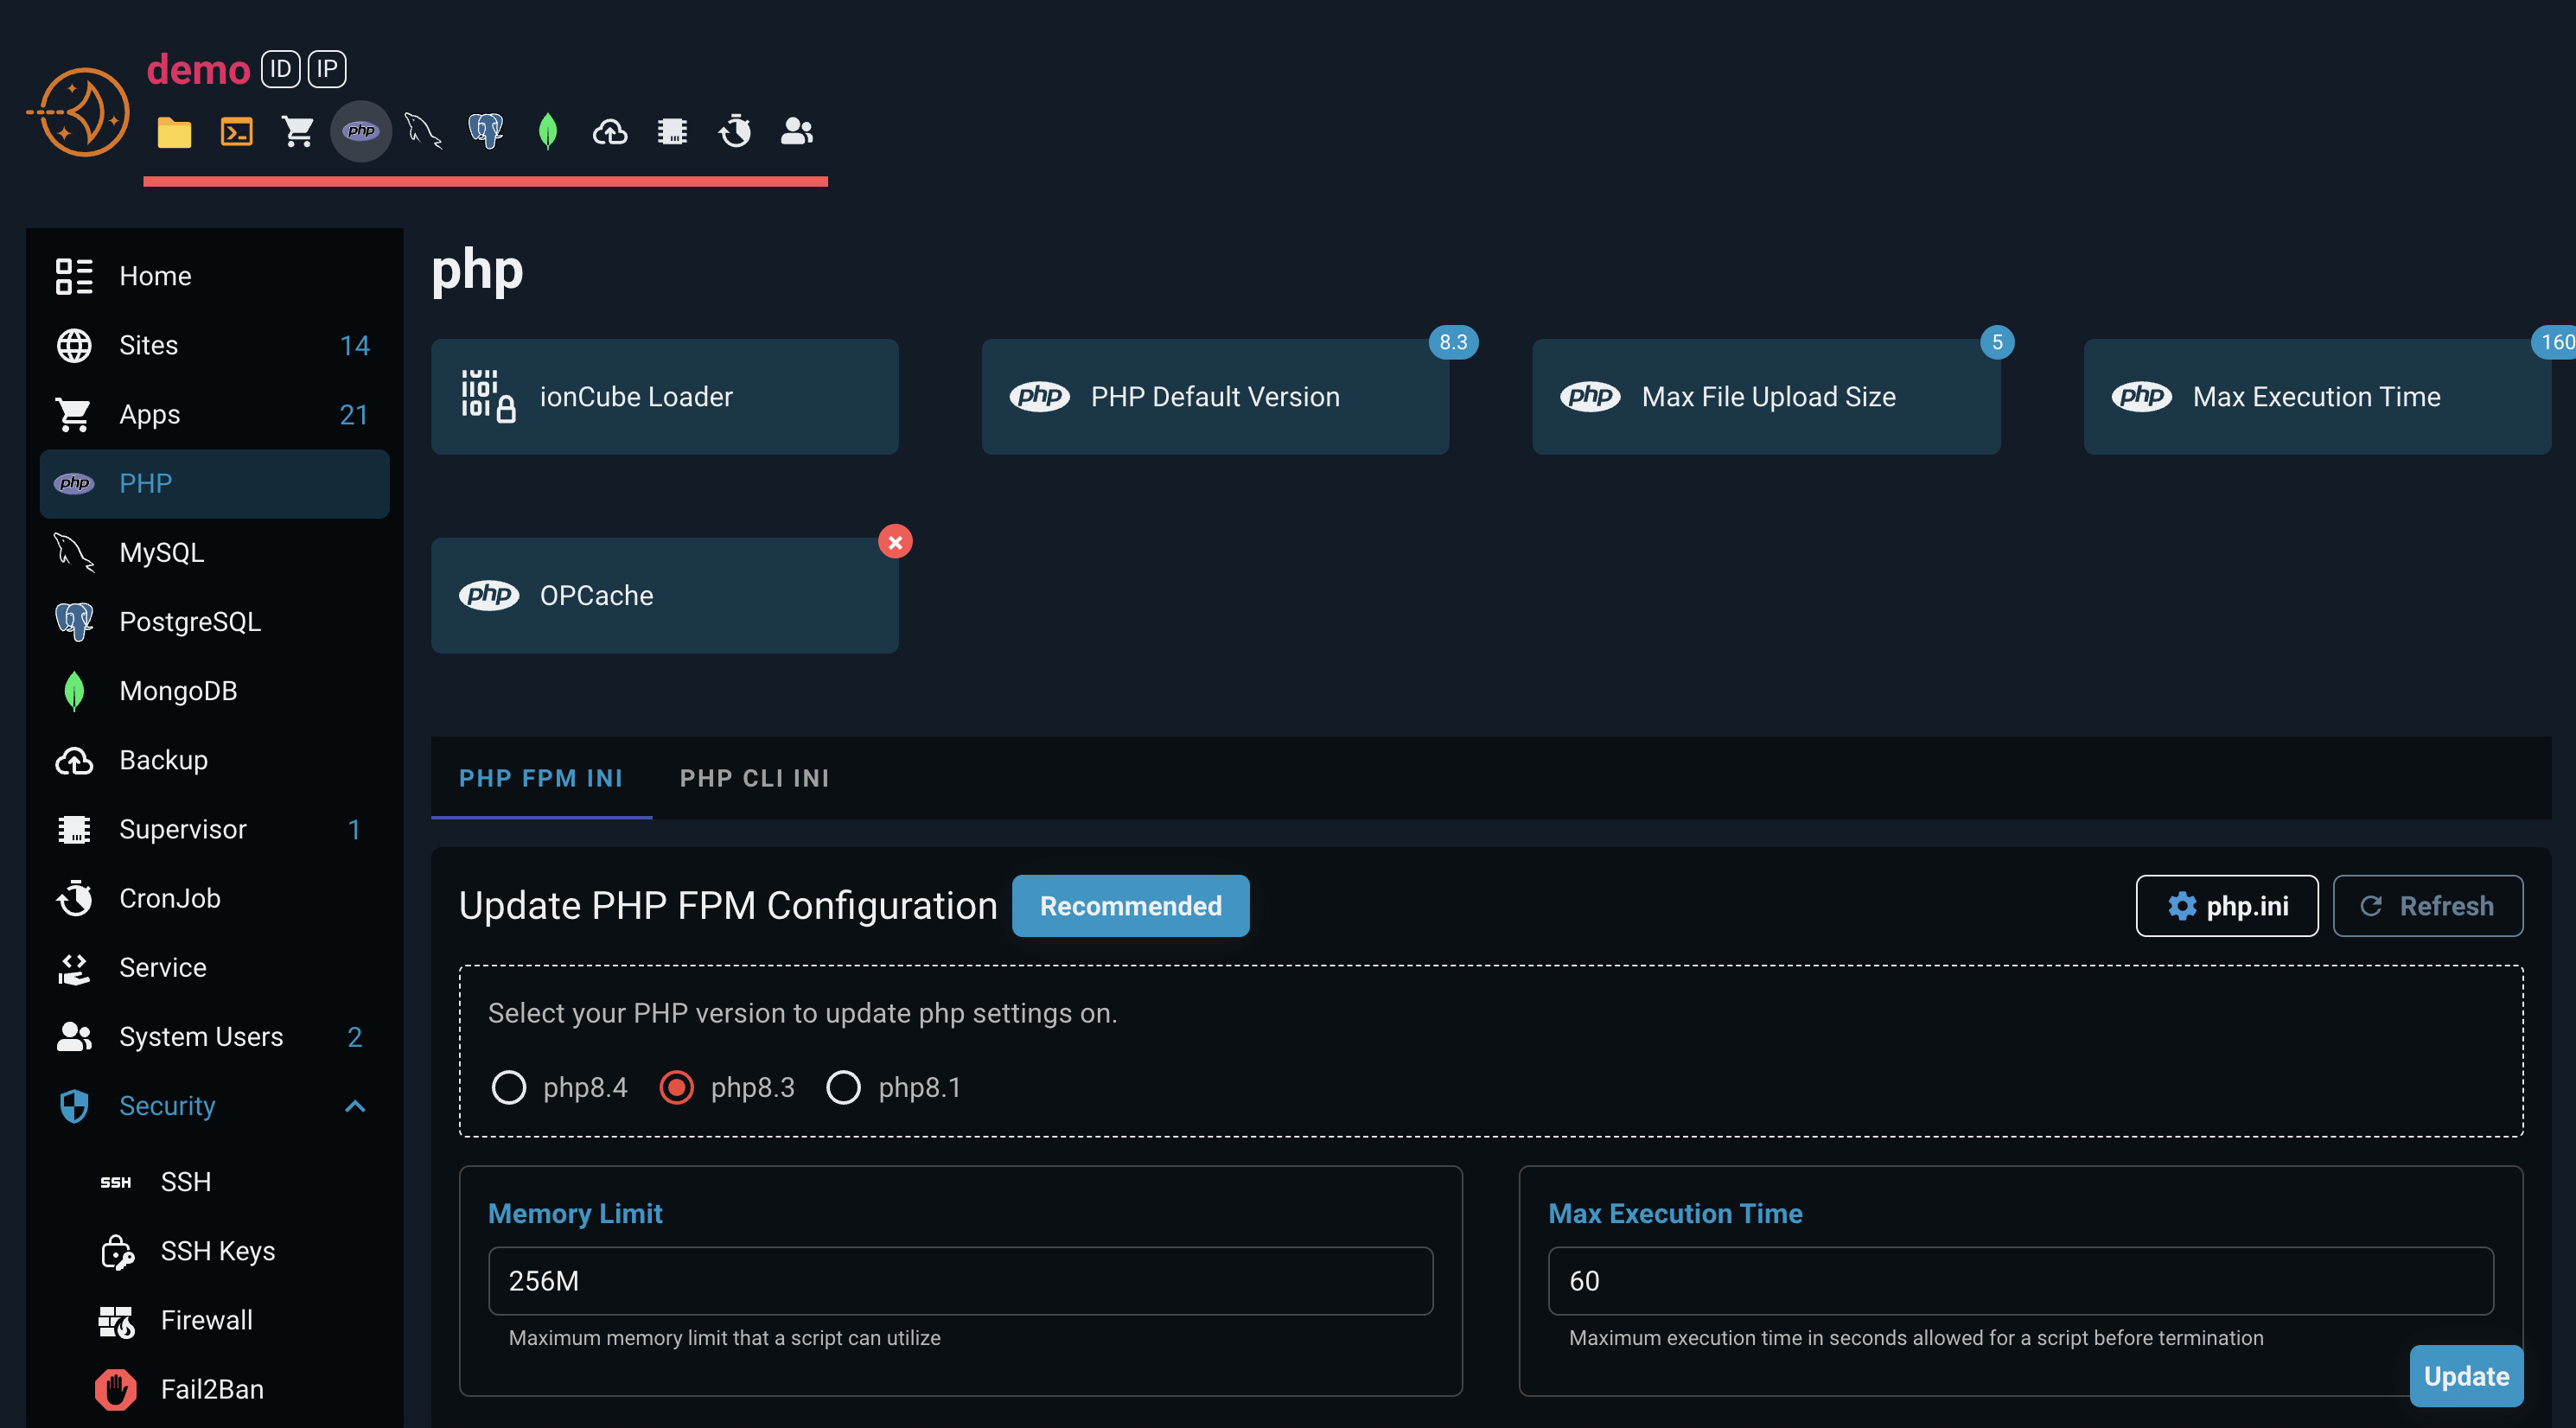
🖱️ How to Use It
Go to PHP Settings section panel.
Click the Recommend button to automatically apply security best practices
- This will set secure default values for all SSH configuration options
- Perfect for users who want enhanced security without manual configuration
- You can still adjust individual settings after applying recommendations
Or modify the sections below as needed:
The system manages the following php ini configuration options:
memory_limit: Maximum memory limit that a script can utilizemax_execution_time: Maximum execution time in seconds allowed for a script before terminationmax_input_time: Time limit in seconds for parsing input data such as POST and GET requestsmax_input_vars: Maximum limit of input variables permitted per requestupload_max_filesize: Maximum file size limit (Megabytes) for file uploadspost_max_size: Maximum POST data size that PHP can processdisplay_errors: Controls whether PHP errors are displayed in the browsererror_reporting: Sets which PHP errors are reporteddate.timezone: Default timezone setting for PHPsession.gc_maxlifetime: Maximum idle time in seconds for a session before being cleaned up by garbage collectordisable_functions: List of PHP functions that are disabled for security reasonsopcache.enable: Activates PHP OPCache to significantly boost performance by caching compiled scripts in shared memoryopcache.memory_consumption: Amount of memory (RAM) allocated for OPcache to store compiled PHP codeopcache.interned_strings_buffer: Memory allocated for storing interned strings to optimize PHP performanceopcache.max_accelerated_files: Maximum limit of PHP files that can be accelerated by OPcacheopcache.validate_timestamps: Whether to automatically detect source code changes for cache refreshopcache.save_comments: Whether to preserve comments in the compiled bytecode cache
Every setting comes with a short, helpful explanation right in the UI.
💡 Notes
- The system will automatically apply new settings after you update.
- Use the Reload button to get the new values applied.
- If something doesn’t work as expected, please contact us.