Configure Nginx
Redirect Rules
FlashPanel allows you to configure redirects that can be configured to automatically redirect visitors from one page to another. These redirection rules can be created via the 'New Rewrite Rule' tab in the website's nginx configuration management interface.
Create a redirect rule
Redirects are wrappers around Nginx's rewrite rules and can use the full redirect syntax supported by Nginx, including regular expressions. For example, you can use = / to match only the root of the domain.
Steps to create Redirect Rule:
At the
Nginx Configurationtab > SelectNew Rewrite Rule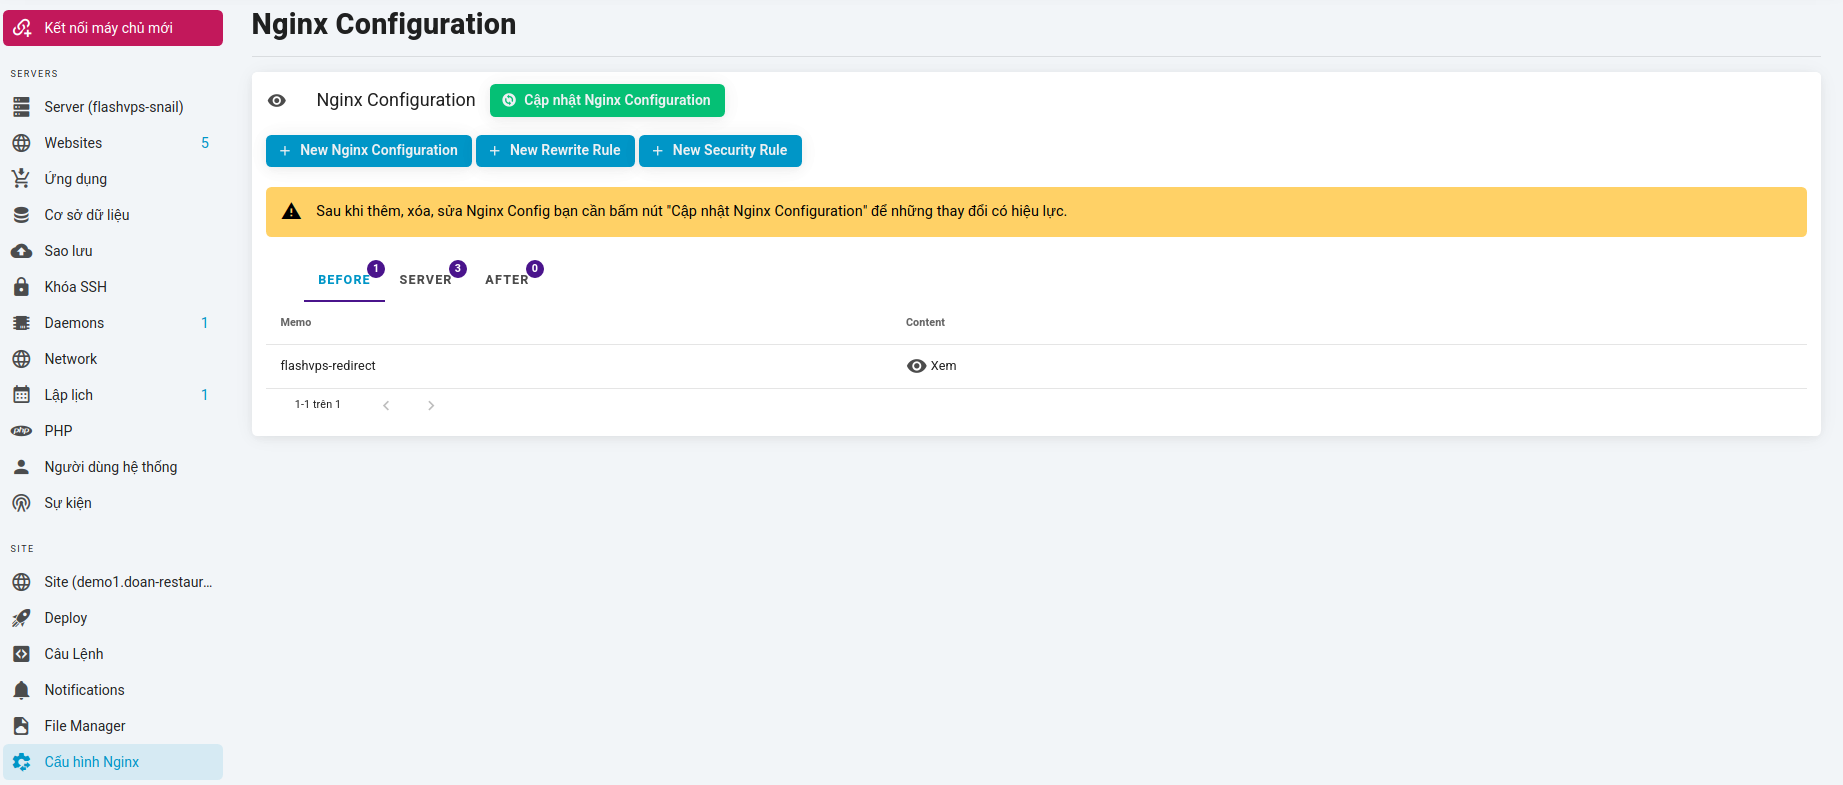
Enter information about the redirect rule
- Memo: A reminder name for the rule
- Type: Temporary redirect | Permanent redirect | last. last
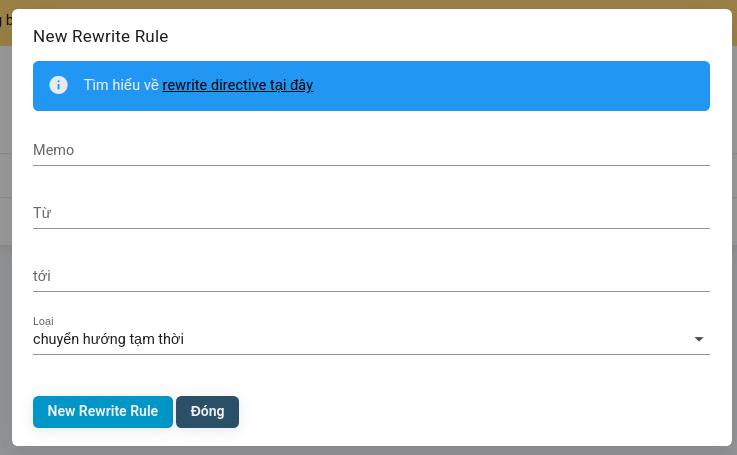
Select
New Rewrite Rule
⚠ INFO: Update Nginx Config.
After adding, deleting, or editing Nginx Config, you need to click the "Update Nginx Configuration" button for the changes to take effect.
Fix redirection rules
You can edit Redirect Rules through the Nginx Configuration tab on your website management dashboard under FlashPanel. Steps to edit redirect rules:
- At the
Nginx Configurationtab > Select theServertab
- Navigate to the navigation rule you want to edit > select pen icon
*Note: Only edit redirection rules and Memo (Memory name) 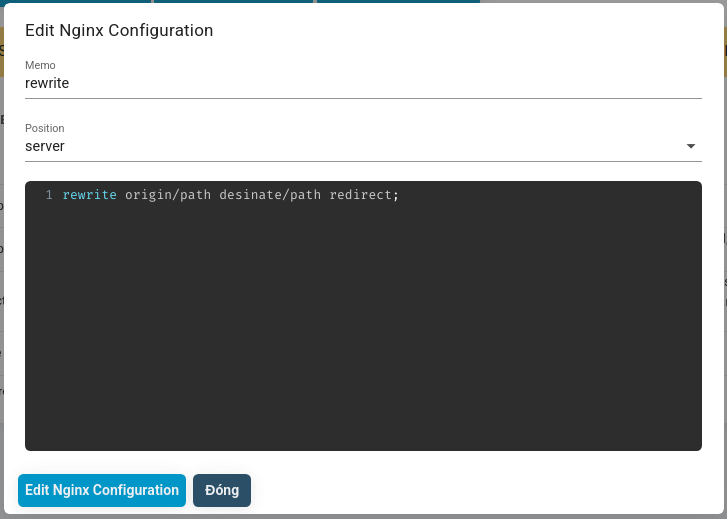 3. Select
 Edit Nginx Configuration
⚠ INFO: Update Nginx Config.
After adding, deleting, or editing Nginx Config, you need to click the "Update Nginx Configuration" button for the changes to take effect.
Temporary redirect and Permanent redirect
FlashPanel supports 2 types of redirects:
- Permanent Redirect (HTTP Status Code 301)
- Temporary Redirect (HTTP Status Code 302)
While both types of redirects are typically invisible to users, browsers handle them differently, and it's important to know the difference.
Temporary redirect
When the browser encounters a temporary redirect, it takes you to the destination and forgets that it was redirected from the original page. If you change the destination page and then visit the original page again, the browser will see the new redirect location and take you there.
Permanent redirect
With a permanent redirect, the browser will remember that it has been redirected away from the original page. To save making another network request, the next time the browser visits the original page, it will see that it has been redirected and immediately visit that page instead.
While you can change the redirect destination permanently, you'll need to clear your browser's cache before accessing the original page again. Changing the redirect permanently is considered bad practice, so be careful when doing so.
Last redirect
The last redirect will either stop looking for rewrites at the current location or intercept and use the changed URI (e.g. rewritten URI) and search the new location for any matching rewrites.
Security Rules
INFO
FlashPanel can configure password protection on your sites using [basic access authentication](https://en.wikipedia.org/wiki /Basic_access_authentication). You can choose to protect your entire website or a specific link.
Create security rules
You can create new Security Rules through the Nginx Configuration tab on your website management console under FlashPanel. You must provide the security rule name that some browsers display in their authentication prompts, as well as at least one set of authentication information. If you need to add more logins, you can click the + button to add a new username and password combination.
Steps to create security rules:
- At the
Nginx Configurationtab > SelectNew Security Rule - Enter information about the redirect rule
- Memo: A reminder name for the rule
- Pair Username and Password: User authentication information and password will be required to enter when accessing the secure path
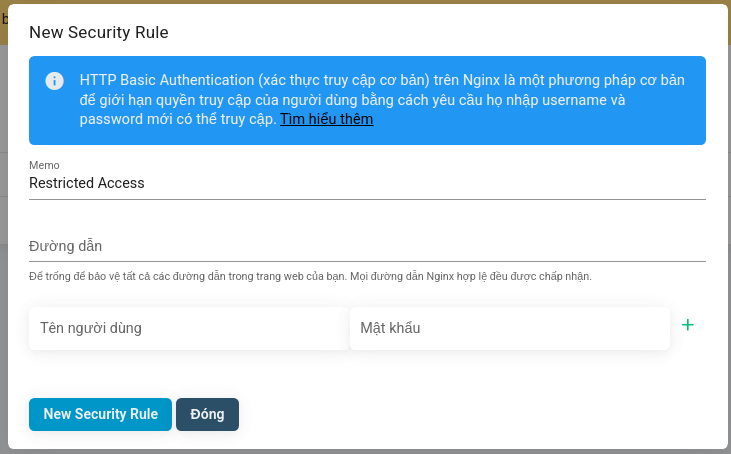
- Select
New Security Rule
⚠ INFO: Update Nginx Config.
After adding, deleting, or editing Nginx Config, you need to click the "Update Nginx Configuration" button for the changes to take effect.
Edit security rules
You can edit Security Rules through the Nginx Configuration tab on your website management console under FlashPanel. Steps to edit security rules:
- At the
Nginx Configurationtab > Select theServertab - Navigate to the security rule you want to edit > select pen icon
*Note: Only edit path that requires security and Memo (Memory name) 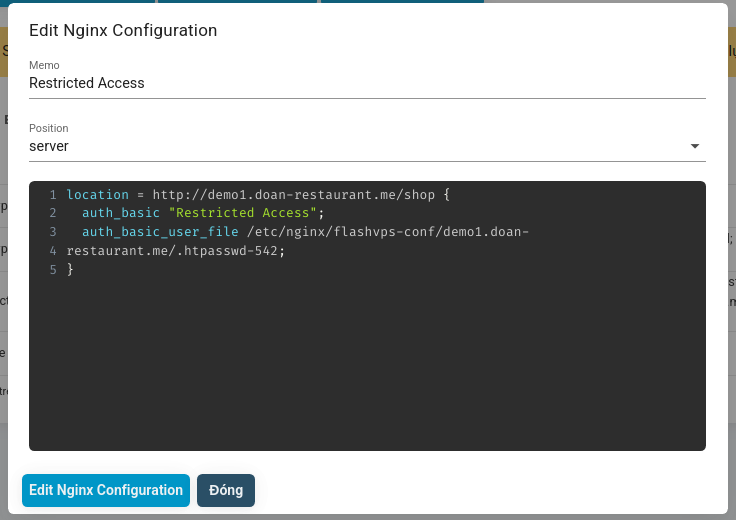 3. Select
 Edit Nginx Configuration
⚠ INFO: Update Nginx Config.
After adding, deleting, or editing Nginx Config, you need to click the "Update Nginx Configuration" button for the changes to take effect.
Credentials
FlashPanel creates a unique .htpasswd file for each security rule, meaning each secured path can have its own set of credentials. This also means that you will need to re-enter the same login information when securing multiple paths. If you need to modify authentication information, you can follow the Edit security rules instructions.
Manage Nginx Configuration
The nginx configuration management interface FlashPanel supports functions that allow you to easily manage nginx configuration files. 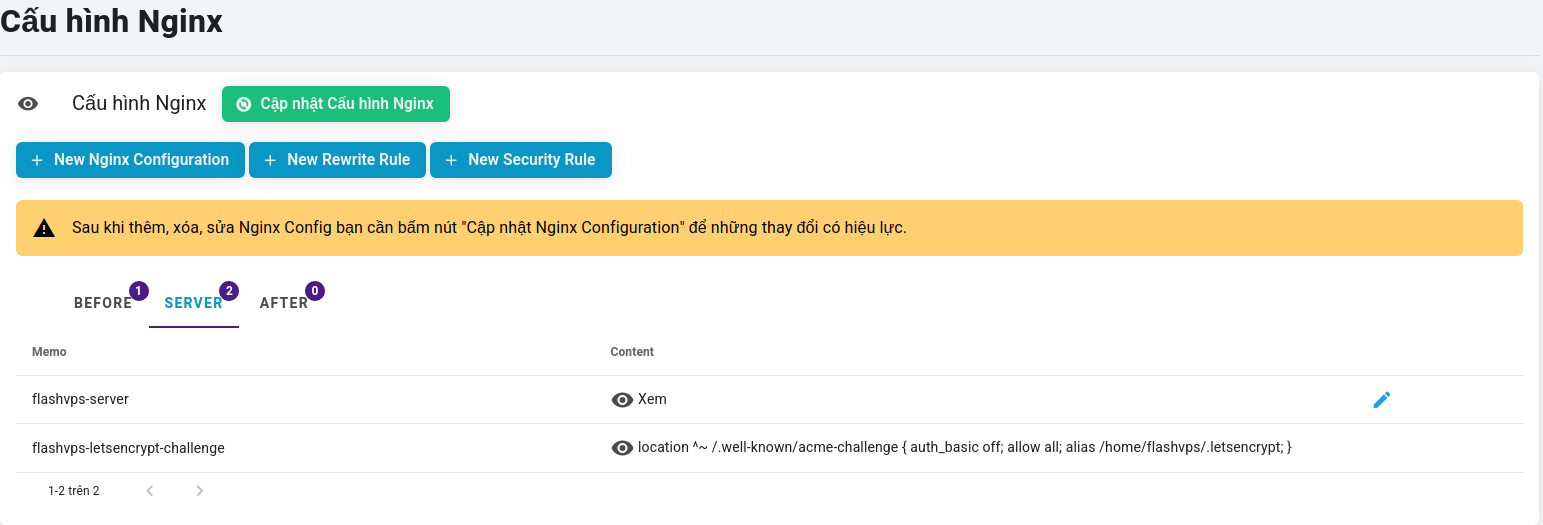
⚠ INFO: Update Nginx Config.
After adding, deleting, or editing Nginx Config, you need to click the "Update Nginx Configuration" button for the changes to take effect.
Preview Nginx configuration
FlashPanel allows viewing the content of the Nginx configuration file in the Nginx Configuration tab of your website management dashboard, selecting the eye icon. 
Create nginx configuration block
FlashPanel helps you create nginx configuration blocks. Steps to create nginx configuration block:
- At the
Nginx Configurationtab > SelectNew Nginx Configuration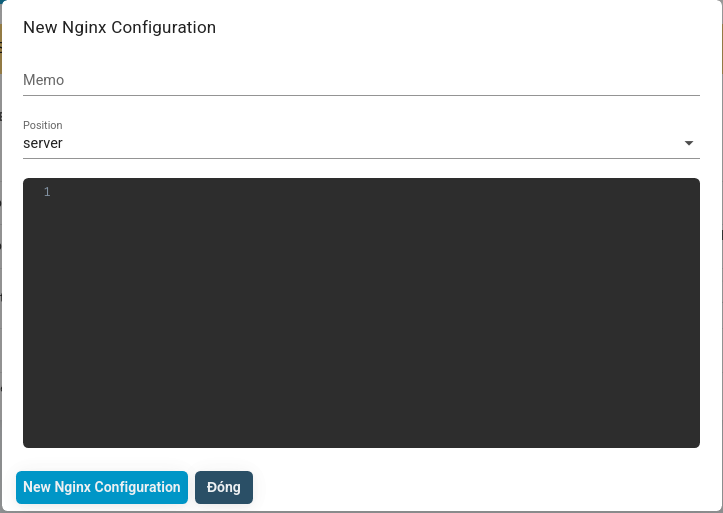
- Fill in the configuration block information
- Memo: A memorable name for the block, this name will only be displayed on the system of
FlashPaneland not saved to your VPS server - Position: Location to save the configuration block in the configuration file for your website.
- Server: The save location will be in the main server block (Block containing all configuration of your website) in the website configuration file
- Before: The save location will be before the main server block
- After: The save location will be after the main server block
- Configuration block content
- Select
New Nginx Configuration
⚠ INFO: Update Nginx Config.
After adding, deleting, or editing Nginx Config, you need to click the "Update Nginx Configuration" button for the changes to take effect.
Fix nginx configuration block
Steps to fix nginx configuration block:
- At the
Nginx Configurationtab > Select the tab location (Before | Server | After) where the configuration block was previously saved - Navigate to the nginx configuration block you want to edit > select pen icon
WARNING
If the block to be edited is Security Block then refer to Edit security rules or Redirect Block refer to [Edit redirection rules] ](#sua-gui-tac-chuyen-huong)
- Fill in the information you want to edit
- Memo: A memorable name for the block, this name will only be displayed on the system of
FlashPaneland not saved to your VPS server - Position: Location to save the configuration block in the configuration file for your website.
- Server: The save location will be in the main server block (Block containing all configuration of your website) in the website configuration file
- Before: The save location will be before the main server block
- After: The save location will be after the main server block
- Configuration block content
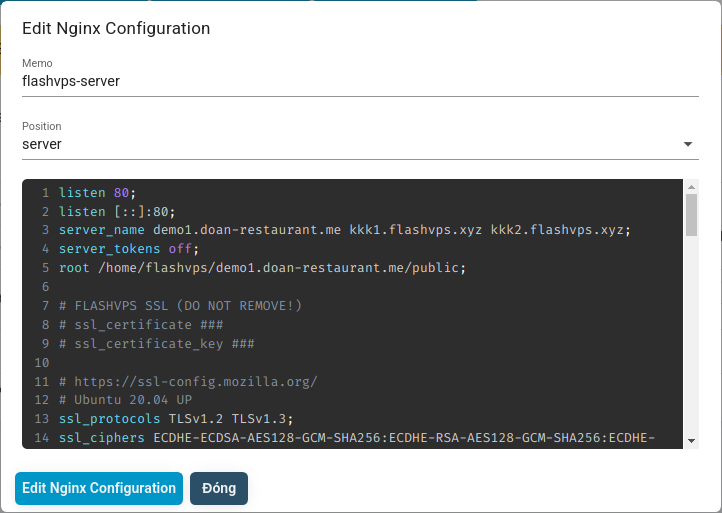
- Once edited, Select
Edit Nginx Configuration
⚠ INFO: Update Nginx Config.
After adding, deleting, or editing Nginx Config, you need to click the "Update Nginx Configuration" button for the changes to take effect.
Update Nginx Configuration
After adding, deleting, or editing Nginx Config, you need to click the "Update Nginx Configuration" button for the changes to take effect. At the Nginx configuration management interface > Select Update Nginx Configuration